Figure 2.1: The invariant "Hello World" appears in the list of invariants
| Home | Download & Installation | Users Guide | Plug-in Developer Guide | newGRAPH forum |
New functionalities for the newGRAPH could be easily programmed and plugged in the program. Additional invariants, graph generators, graph operations and the support for new graph file formats are all the areas which could be easily extended. The only prerequisite that the user needs is some basic knowledge of Java, and everything else could be learned in about an hour, the time needed to go through this tutorial.
Note: This tutorial requires Java SDK 1.5 or higher to be installed. It can be downloaded from http://java.sun.com. It also assumes that a copy of newGRAPH is installed.
This section explains how to create new invariants and plug them into the newGRAPH. It also explains how to plug in custom created parts of the newGRAPH.
We'll start by creating an invariant which simply displays the text "Hello, World!". A new file named HelloWorldInvariant.java should be created with any text editor. The following Java source code should be copy/pasted into the editor, and the file should be saved.
|
The java file is compiled by calling the javac compiler. Additionally, a path to the newgraph-api.jar archive must be specified as a classpath. In the case the newGRAPH is installed in the C:\Program Files directory, the command line will look like:
javac -classpath "c:\Program Files\newGRAPH\lib\newgraph-api.jar
HelloWorldInvariant.java
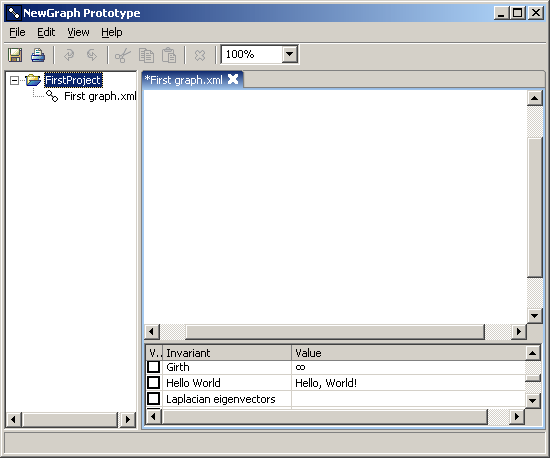
It will create a file HelloWorldInvariant.class. This file should be copied to the directory newGRAPH/plugins/classes. After this, newGRAPH should be started, or restarted, if it is already running, and the invariant will appear in the list of invariants.

Figure 2.1: The invariant "Hello World" appears in the list of invariants
Let's inspect the code of the invariant. The name of the invariant is specified in the method getName. The name is displayed in the left column of the invariants table.
|
The description of the invariant comes next. It is retrieved through the method getDescription:
|
Finally, the method calculate calculates the value of the invariant. In our case, it simply retrieves the "Hello World" message:
|
To calculate an invariant, one has to get a full control of how the graph looks like. The class GraphData, which is supplied as a parameter to the method calculate does just that - reports the graph structure. It has a large number of helper methods, which are listed and described in the API, but right now we will concentrate on just a few. For instance, the method int getOrder() returns the number of vertices in the graph. We will create an invariant which retrieves just that, the invariant "Order".
But first, let's come back to the invariant "Hello World". It is of the type InvariantString, which means that it retrieves a string as its result.
|
This would also fit the invariant Order, because the number of vertices is a string after all, but more suitable invariant type will be InvariantInt, which is the type of invariant which retrieves an integer object. Differenting types of invariants is important when it comes to some advanced functions of the system, like visuelization and invariant chaining. The list of the invariant types, and the types of results they produce, is given in the table 2.2.
| Type | Returns |
|---|---|
| InvariantBoolean | boolean |
| InvariantDouble | double |
| InvariantDoubleArray | double [] |
| InvariantDoubleEdge | assigns double values to edges through EdgeDoubleValues |
| InvariantDoubleMatrix | double [][] |
| InvariantDoubleVertex | assigns double values to vertices through VertexDoubleValues |
| InvariantEdge | EdgeData |
| InvariantEdgeArray | EdgeData [] |
| InvariantInt | int |
| InvariantIntArray | int [] |
| InvariantIntEdge | assigns int values to edges through EdgeIntValues |
| InvariantIntMatrix | int [][] |
| InvariantIntVertex | assigns int values to vertices through VertexIntValues |
| InvariantString | String |
| InvariantVertex | VertexData |
| InvariantVertexArray | VertexData [] |
Table 2.2: Types of invariants
We should now create a new file named OrderInvariant.java in the text editor. The starting structure of the file will be similar to the invariant "Hello World":
|
Compile and save the invariant class in the plugins directory. After the newGRAPH is restarted, it will display 0 as the number of vertices, which is not actually what we would like to have. Using the method int getOrder():
|
, the correct value is produced.
In the next example, we would like to know the number of vertices of the degree 1. The best way to program this would be to go through all the vertices and inspect their degree. The method Enumeration vertices() returns an enumeration on all the vertices in the graph. Each element of the enumeration is of the type VertexData. This class is to the vertex as the GraphData is to the graph, it reports data about the vertex. It is better described in the plugin API, now we will only need the method int degree(), which retrieves the degree of the vertex. For this occasion, we can make another invariant, named "Order One":
|
What if we would like to get the number of vertices of the degree that the user enters? In the following example, we will create the invariant which gives the number of vertices of the degree K, where K is the parameter entered by the user. For start, we will create the invariant "Order K", looking almost exactly the same as the previous example:
|
Having a parametrization requires the invariant to fullfill a few requirements. First, each parameter must have the standard JavaBean methods for getting and setting the parameter value, <type> get<param_name>() and void set<param_name>(<type>). Such methods for the integer parameter named "K" will look like:
|
Additionally, the whole class must implement the interface Parametrizable and the method String checkParameters(). This method should checks the parameters and retrieve the error string if the parameter values are invalid. If the values are valid, the method should return null. In this example, we will require that the parameter K has positive value:
|
We should change the method calculate to use the variable K for the checked number of vertices. The complete source code of the invariant is:
|
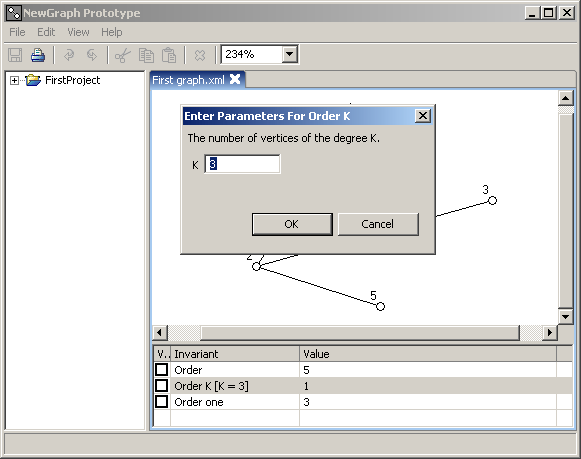
Upon installing the invariant "Order K" and restarting newGRAPH, by double clicking the invariant, we are able to set the parameter K:

Figure 2.3: Entering parameters for the invariant "Order K"
The table 2.4 gives an overview of the classes that could be used for parameters, and how would they appear in the dialog for parametrization.
| Type | Appearance in the parametrization dialog |
|---|---|
| boolean | Checkbox |
| byte | Select box |
| double | Text input |
| GraphData | Select box on the open graphs |
| int | Text input |
Table 2.4: Types of parameters
The only parameter that needs a special attention is the parameter byte. It is used to let the user select one of the given choices in the select box. For instance, we would like to modify the invariant "Order K" so that it can retrieves the number of vertices of the order <= K, = K or >= K. Therefore, we introduce another parameter, named "Compare", which indicates which comparison takes place. The parameter must be of the type byte:
|
Additionally, we must provide the set of choices. We do it by specifying a set of public static final byte variables, whose name begins with the name of the invariant and underscore. For example, our choices will be:
|
Finally, we change the method calculate, to include the functionality of the new parameter:
|
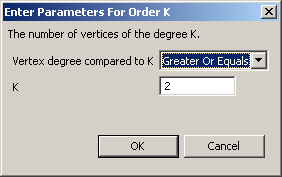
We will end with specifying the parameter description. Let's say that we don't like the text "Compare", that appears in the parametrization dialog. To give a better explanation of a parameter, a method String get<param>Name() should be implemented. In this example, we will replace it with the text "Vertex degree compared to K":
|
The new text appears in the parametrization dialog:

Figure 2.5: Parameter descriptions.
A result of an invariant could be simply used for calculating some other invariant. It is just important that both invariants are installed at the same time. In the following example, we are using the result of the invariant Spectrum, which returns the spectrum of the graph, to calculate the energy of the graph:
|
As an additional parameter, we may require the user to provide weights on vertices and edges. For instance, we may wish to make an invariant which calculates distances in a weighted graph. Weights are supplied as parameters of the type weight.
|
To get a value of the weight on an edge or vertex, one should use the method getWeight:
|
There are four types of weights, depending on whether they weigh vertices or edges, and depending of whether the weight is an integer or a real number.
| Class | Weight type |
|---|---|
| WeightVertexInt | Weighs vertices with integer numbers. |
| WeightVertexDouble | Weighs vertices with real numbers. |
| WeightEdgeInt | Weighs edges with integer numbers. |
| WeightEdgeDouble | Weighs edges with real numbers. |
Table 2.6: Types of weights
Graph generators appear under the option New, as the last group of options in the submenu. They allow the user to generate graphs of a certain type. Graph generators follow the same principles as the graph invariants. They are installed the same way, and they support parametrization the same way. For the example, we will create the generator which produces binary trees of a certain depth.
We will create a file "BinaryTreeGen.java". The starting code for writing generators should look like:
|
After it is installed, it appears under the menu New:

Figure 3.1: Graph generator "Binary Tree" appears in the menu
Currently, it produces an empty graph. The method which creates the graph is void newGraph(Graph graph). In our example, this method will need parameter for the depth of the graph. Using the rules for parametrization from the previous section, we can add the new parameter.
|
Now we only have to create the method for generating the graph. The method newGraph is supplied with the instance of the class Graph. The class Graph has a number of methods for creating vertices, edges, deleting parts of the graph and handling many other graph properties, which are better described in the section API. Right now, the only two methods that we will need will be Vertex createVertex(double x, double y), which creates a vertex on the specified coordinates, and Edge createEdge(Vertex a, Vertex b), which connects the given vertices.
The tree will be created recursively. If the depth of the tree is 1, a single vertex will be created. If the depth is greater then 1, the root vertex will be created, and the method will be called for two subtrees for the depth - 1. The root will be connected with the roots of the two subtrees. Initially, the method will be called for the parameter depth.
|
Graph actions change the graph during the graph editing. They are available from the menu Edit, or from the context menu shown by right clicking the graph edit area. They can change the graph, but they can also change the current selection, move vertices, and do all the transformations that the class Graph provides API.
All the rules for the invariants and generators apply for the graph actions. They could have additional parameters, and they are installed in the newGRAPH the same way. As an example graph action, we will create the action which duplicates every selected vertex.
We will create a file DoubleSelectedAction.java. The starting source code for the graph actions should look like this:
|
Again, there are methods for specifying the name and the descriptions. The method void action(Graph graph, boolean ctrl, boolean shift) is the one responsible for what happens with the graph when the user clicks on the option. We will create a code which goes through all the selected vertices, creates a duplicate vertex and connects it to all the neighbors of the source vertex. We will use two new methods: Enumeration Graph.selectedVertices(), which returns the enumeration of all the selected vertices, and Enumeration Vertex.getNeighbors(), which returns enumeration on all the neighbors of the vertex. The resulting code will be:
|
The method action accepts two boolean parameters: ctrl and shift, which indicate were these buttons held when the action was triggered. The programmer can make the action have different effects accordingly.
If we take a look at the code, we will see that the action will do nothing if there are no selected vertices. Therefore, one might wish to turn the option off in such case. That's what the method isEnabled is for: it tells the system that the graph is in such state the the action can or can not be executed. We can add this check:
|
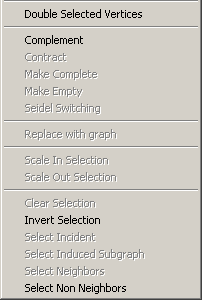
The actions from the "Edit" menu are divided into groups with the menu separators. The grouping is defined by the name of the action. If the name contains a dot, the part before the dot is considered the name of the group. For instance, the name of the action "Changers.Complement indicates that the group that the action belongs to is "Changers", while the title of the action is "Complement".

Figure 4.1: Graph actions menu
We will assign our newly created action the name "Changers.Double Selected Vertices", so that it appears with other actions whose primary functionalities are to change the structure of the graph:
|
A graph can be set to be a result of a transformation of some other graph. When the other graph changes, the dependant graph changes too. Thus, the user is able to track changes of on the resulting graph as he modifies the source graph. Graph dependancies are the plugins that establish such connections.
The structure of a graph dependancy is almost the same as the other plugins. They have to provide the name, description, and a method to create the dependant graph:
|
To have a source graph, one should use the GraphData parameter, the usual way:
|
It is possible to use more graphs as parameters, as well as all the other parameters, such as constants and weights.
The user might need to open a graph from the file which is not readable by the newGRAPH, or he might wish to export the graph to a file of such type. The support for the new file types is another plug-and-play feature.
As an example, we will create a support for some fictional file type "GraphTxt". We'll start with a skeleton for the plugin, in a file named GraphTxtFileType.java:
|
The method getName simply returns the name of the file type. The method getExtension returns the file extension that the IO plugin accepts. Similarily, the method boolean accepts(File) tells is the file accepted for reading. This method is important in the case there are more IO plugins which deal with the same file extension, to differentiate between the file types. Finally, the methods read and write handle the file input and output.
It is important to say that each vertex has four important properties: X, Y, ID and Label. The first two are the coordinates. The third one is an unique integer identificator, and the last one is the string label.
Our fictional file type has the following structure. The first line contains the number of vertices, say N. The next N lines contain information about the vertices, separated by comma: X, Y, ID and Label. The next line contains the number of edges, say M, and the next M lines contain the ID's of the vertices connected by the respected edge.
The method write gets two input parameters: File file, which should be written, and GraphData data, which provides information about the graph. The implementation of the method should be straightforward:
|
The method read gets the file which should be read as the first parameter, whereas the second parameter is the graph that should be created. The implementation in our example will be:
|
It's important to add that the only exception that should be thrown are GraphRWException. They should generally indicate that something is wrong with the file, and it can't be read. The message it gets as the parameter is the message that is displayed to the user in the alert box when he tries to open a faulty file. The best practice with other exceptions that may occur during the read is to catch them, and immediately propagate furtrer wrapped in a GraphRWException, the way it is shown:
|
Graph exporters are tools that provide one way exporting graphs to a certain file. The most common usage would be to provide exporting graphs in various graphics formats, such as BMP, GIF, EPS, PS, WMF and other formats. A plugin of this type should give the name, the extension that it works with, and the method for exporting graphs.
|
This section gives a brief overview of the classes that represent graph. To get the full reference, use the newGRAPH API.
There are two groups of classes that work with graphs: read-only classes and read-write classes. The read-only classes can only report the graph structure, whereas the read-write classes can change the graph structure.
| Read-only | Read-write |
|---|---|
| GraphData | Graph |
| VertexData | Vertex |
| EdgeData | Edge |
Table 7.1: Read-only and read-write classes
Each vertex in the graph has four main properties: X and Y coordinates, a unique integer ID, and a String Label. Vertices are created using the method Vertex Graph.createVertex(double x, double y), which takes the coordinates, and automatically assigns a new ID, and assigns a label that's equal to the ID. Another method, Vertex Graph.createVertex(int id, double x, double y, String label), creates a vertex with the desired ID and Label. In the case the specified ID already exists, this method throws a DuplicateIDException, because the ID number must be unique for each of the vertices. The same rule applies for the double labels, in which case a DuplicateLabelException is thrown.
To create an edge, the method createEdge(int idA, int idB) is used, which takes the IDs of the vertices which should be connected as parameters. There is another version of the method, createEdge(Vertex va, Vertex vb), which takes objects of the type Vertex. Likewise, there are many other methods which differ in the form of the parameter, but basically produce the same effect.
The set of selected vertices and edges is also managable through these classes. For instance, method boolean Vertex.isSelected() tell whether the vertex is selected, and the methods void Edge.select() and void Edge.deselect() select and deselect the edge. Since more vertices and edges could be selected at the same time, the first selected vertex and edge are distinctive. Some of the methods that access them are VertexData GraphData.getPrimarySelectedVertex() and EdgeData GraphData.getPrimarySelectedEdge().
Some of the methods address the file where the graph is stored. For exampe, String Graph.getAbsolutePath() returns the name of the file where the graph is stored, and boolean Graph.isDirty() tells was the graph changed after the last change.
The complete API for the classes that are used for writing plugins for the newGRAPH is available here.
In the examples used in this manuals, the plugins were deployed as compliled java classes in the directory newGRAPH/plugins/classes. However, classes could be packaged into Jar or ZIP archives, and saved in the directory newGRAPH/plugins/lib. All libraries that some plugin or plugin libraries depend on must be also saved in the direcory newGRAPH/plugins/lib.